
The number of generative artificial intelligence (AI) features is growing within software offerings, especially after market-leading foundational models (FMs) became consumable through an API using Amazon Bedrock. Amazon Bedrock is a fully managed service that offers a choice of high-performing foundation models from leading AI companies like AI21 Labs, Anthropic, Cohere, Meta, Stability AI, and Amazon through a single API, along with a broad set of capabilities you need to build generative AI applications with security, privacy, and responsible AI.
Agents for Amazon Bedrock enables software builders to complete actions and tasks based on user input and organization data. A common challenge in multi-tenant offerings, such as software as a service (SaaS) products, is tenant isolation. Tenant isolation makes sure each tenant can access only their own resources—even if all tenants run on shared infrastructure.
You can isolate tenants in an application using different multi-tenant architecture patterns. In some cases, isolation can be achieved by having entire stacks of resources dedicated to one tenant (silo model) with coarse-grained policies to prevent cross-tenant access. In other scenarios, you might have pooled resources (such as one database table containing rows from different tenants) that require fine-grained policies to control access. Oftentimes, Amazon Web Services (AWS) customers design their applications using a mix of both models to balance the models’ tradeoffs.
Isolating tenants in a pooled model is achieved by using tenant context information in different application components. The tenant context can be injected by an authoritative source, such as the identity provider (IdP) during the authentication of a user. Integrity of the tenant context must be preserved throughout the system to prevent malicious users from acting on behalf of a tenant that they shouldn’t have access to, resulting in potentially sensitive data being disclosed or modified.
FMs act on unstructured data and respond in a probabilistic fashion. These properties make FMs unfit to handle tenant context securely. For example, FMs are susceptible to prompt injection, which can be used by malicious actors to change the tenant context. Instead, tenant context should be securely passed between deterministic components of an application, which can in turn consume FM capabilities, giving the FM only information that is already scoped down to the specific tenant.
In this blog post, you will learn how to implement tenant isolation using Amazon Bedrock agents within a multi-tenant environment. We’ll demonstrate this using a sample multi-tenant e-commerce application that provides a service for various tenants to create online stores. This application uses Amazon Bedrock agents to develop an AI assistant or chatbot capable of providing tenant-specific information, such as return policies and user-specific information like order counts and status updates. This architecture showcases how you can use pooled Amazon Bedrock agents and enforce tenant isolation at both the tenant level for return policy information and the user level for user-related data, providing a secure and personalized experience for each tenant and their users.
Architecture overview

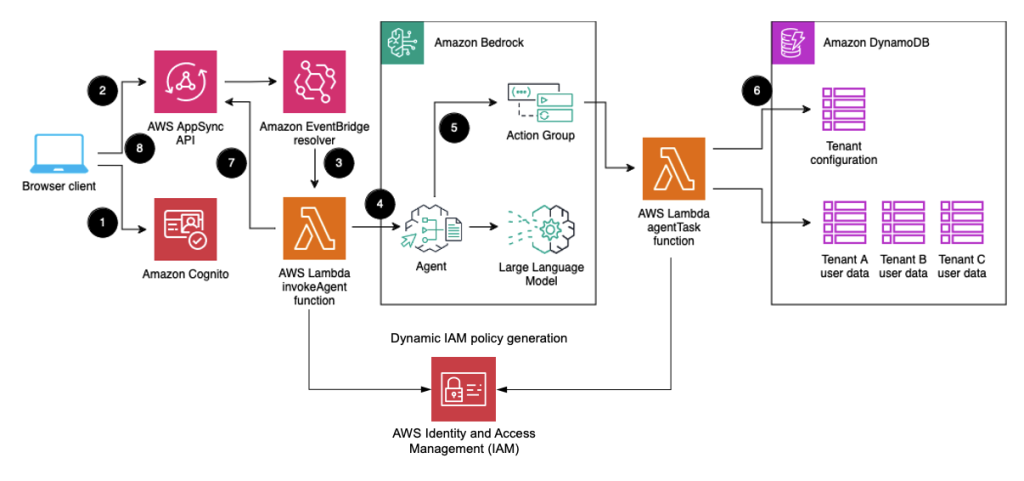
Figure 1: Architecture of the sample AI assistant application
Let’s explore the different components this solution is using.
- A tenant user signs in to an identity provider such as Amazon Cognito. They get a JSON Web Token (JWT), which they use for API requests. The JWT contains claims such as the user ID (or subject,
sub), which identifies the tenant user, and thetenantId, which defines which tenant the user belongs to. - The tenant user inputs their question into the client application. The client application sends the question to a GraphQL API endpoint provided by AWS AppSync, in the form of a GraphQL mutation. You can learn more about this pattern in the blog post Build a Real-time, WebSockets API for Amazon Bedrock. The client application authenticates to AWS AppSync using the JWT from Amazon Cognito. The user is authorized using the Cognito User Pools integration.
- The GraphQL mutation invokes using the EventBridge resolver. The event triggers an AWS Lambda function using an EventBridge rule.
- The Lambda function calls the Amazon Bedrock InvokeAgent API. This function uses a tenant isolation policy to scope the permissions and generates tenant specific scoped credentials. More about this can be read in the blog Building a Multi-Tenant SaaS Solution Using AWS Serverless Services. Then, it sends the tenant ID, user ID and tenant specific scoped credentials to this API using the
sessionAttributesparameter from the agent’ssessionState. - The Amazon Bedrock agent determines what it needs to do to satisfy the user request by using the reasoning capabilities of the associated large language model (LLM). A variety of LLMs can be used, and for this solution we used Anthropic Claude 3 Sonnet. It passes the
sessionAttributesobject to an action group determined to help with the request, thereby securely forwarding tenant and user ID for further processing steps. - This Lambda function uses the provided tenant specific scoped credentials and tenant ID to fetch information from Amazon DynamoDB. Tenant configuration data is stored in a single, shared table, while user data is split in one table per tenant. After the correct data is fetched, it’s returned to the agent. The agent interacts with the LLM for the second time to formulate a natural-language answer to the user based on the provided data.
- The agent’s response is published as another GraphQL mutation through AWS AppSync.
- The client listens to the response using a GraphQL subscription. It renders the response to the user after it’s received from the server.
Note that each component in this sample architecture can be changed to fit into your pre-existing architecture and knowledge in the organization. For example, you might choose to use a WebSocket implementation through Amazon API Gateway instead of using GraphQL or implement a synchronous request and response pattern. Whichever technology stack you choose to use, verify that you securely pass tenant and user context between its different layers. Do not rely on probabilistic components of your stack, such as an LLM, to accurately transmit security information.
How tenant and user data is isolated
This section describes how user and tenant data is isolated when a request is processed throughout the system. Each step is discussed in more detail following the diagram. For each prompt in the UI, the frontend sends the prompt as a mutation request to the AWS AppSync API and listens for the response through a subscription, as explained in step 8 of Figure 1 shown above. The subscription is needed to receive the answer from the prompt, as the agent is invoked asynchronously. Both the request and response are authenticated using Amazon Cognito, and the request’s context, including user and tenant ID, is made available to downstream components.

Figure 2: User and tenant data isolation
- For each prompt created in the sample UI, a unique ID(
answerId) is generated. TheanswerIdis needed to correlate the input prompt with the answer from the agent. It uses the Cognito user ID (stored in the sub field in the JWT and accessible asuserIdin the AWS Amplify SDK) as a prefix to enable fine-grained permissions. This is explained in more depth in step 3. TheanswerIdis generated in thepage.tsxfile:
- The frontend uses the AWS Amplify SDK, which takes care of authenticating the GraqhQL request. This is done for the prompt request (a GraphQL mutation request) and for the response (a GraphQL subscription which listens to an answer to the prompt). The authentication mode is set in the tsx file. Amplify uses the Amazon Cognito user pool it has been configured with. Also, the previously generated answerId is used as a unique identifier for the request.
- The frontend sends the GraphQL mutation request and the response is received by the subscription. To correlate the mutation request and response in the subscription, the
answerId, generated in Step1, is used. By running the code below in a resolver attached to a subscription, user isolation is enforced. Users cannot subscribe to arbitrary mutations and receive their response. The code verifies that that theuserIdin the mutation request matches theuserIdin the response received by the subscription. Thectxvariable is populated by AWS AppSync with the request’s payload and metadata such as the user identity.
Note that the authorization is checked against the cryptographically signed JWT from the Amazon Cognito user pool. Hence, even if a malicious user could tamper with the token locally to change the userId, the authorization check would still fail.
- The
userIdandtenantId(from the AWS AppSync context) is passed on to Amazon EventBridge and to AWS Lambda, which invokes the Agent. The Lambda function gets the user information from the event object in fileinvokeAgent/index.py:
The Lambda function assumes the below IAM role that has permissions scoped down to a specific tenant and generates tenant specific scoped credentials. This role only grants access to DynamoDB items which has the given tenant ID as the leading key.
- This identity information and tenant specific scoped credentials are passed to the agent through
sessionAttributesin the Amazon Bedrock InvokeAgent API call as shown below.
- The
sessionAttributesare used within the agent task to grant the agent access to only the database tables and rows for the specific tenant user. The task creates a DynamoDB client using the tenant-scoped credentials. Using the scoped client, it looks up the correct order table name in the tenant configuration and queries the order table for data:
When modifying / debugging this function, make sure that you don’t log any credentials or the whole event object.
Walkthrough
In this section, you will set up the sample AI assistant described in the previous sections in your own AWS account.
Prerequisites
For this walkthrough, you should have the following prerequisites:
Enable large language model
An agent needs a large language model (LLM) to reason about the best way to fulfil a user request and formulate natural-language answers. Follow the Amazon Bedrock model access documentation to enable Anthropic Claude 3 Sonnet model access in the us-east-1 (N. Virginia) Region. After enabling the LLM, you will see the following screen with a status of Access granted:

Figure 3: You have now enabled Anthropic Claude 3 Sonnet in Amazon Bedrock for your AWS account.
Deploy sample application
We prepared most of the sample application’s infrastructure as an AWS Cloud Development Kit (AWS CDK) project.
If you have never used the CDK in the current account and Region (us-east-1), you must bootstrap the environment using the following command:
Using your local command line interface, issue the following commands to clone the project repository and deploy the CDK project to your AWS account:
This takes about 3 minutes, after which you should see output similar to the following:
In addition to the AWS resources shown in Figure1, this AWS CDK stack provisions three users, each for a separate tenant, into your AWS account. Note down the passwords for the three users from the CDK output, labelled MultiTenantAiAssistantStack.tenantXPassword. You will need them in the next section. If you come back to this walkthrough later, you can retrieve these values from the file cdk/cdk-output.json generated by the CDK. Note that these are only initial passwords and need to be changed on first sign-in of each user.
You have now successfully deployed the stack called MultiTenantAiAssistantStack.
Start the frontend and sign in
Now that the backend is deployed and configured, you can start the frontend on your local machine, which is built in JavaScript using React. The frontend automatically pulls information from the AWS CDK output, so you don’t need to configure it manually.
- Issue the following commands to install dependencies and start the local webserver:
Open the frontend application by visiting localhost:3000 in your browser. You should see a sign-in page:
Figure 4: Sign-in screen
- For Username, enter
tenant1-user. For Password, enter the password you have previously retrieved from CDK output. - Set a new password for the user.
- On the page Account recovery requires verified contact information, choose Skip.
You’re now signed in and can start interacting with the agent.
Interact with the agent
You have completed the setup of the architecture shown in Figure 1 in your own environment. You can start exploring the web application by yourself or follow the steps suggested below.
- Under Enter your Prompt, enter the following question logged in as
tenant1-user:What is your return policy?
You should receive a response that you can return items for 10 days. Tenant 2 has a return policy of 20 days, tenant 3 of 30 days. - Under Enter your Prompt, enter the following question:
Which orders did I place?
You should receive a response that you have not placed any orders yet.

Figure 5: Sample application screenshot
You have now verified the functionality of the application. You can also try to access data from another user, and you will not get an answer due to the scoped IAM policy. For example, you can modify the agent and hardcode a tenant ID (such as tenant2). In the UI, sign in as the tenant1 user and you will see that with the generated tenant1 scoped credentials you will not be able to access tenant2 resources and you will get an AccessDeniedException. You can also see the error in the CloudWatch Logs for the AgentTask Lambda function:
[ERROR] ClientError: An error occurred (AccessDeniedException) when calling the Query operation: User: *****/agentTaskLambda is not authorized to perform: dynamodb:Query on resource: TABLE because no identity-based policy allows the dynamodb:Query action
Add test data
To simplify the process of adding orders to your database, we have written a bash script that inserts entries into the order tables.
- In your CLI, from the repository root folder, issue this command to add an order for tenant1-user:
./manage-orders.sh tenant1-user add - Return to the web application and issue the following prompt:
Which orders did I place?
The agent should now respond with the order that you created. - Issue the following command to delete the orders for
tenant1-user:./manage-orders.sh tenant1-user clear
Repeat steps 1 through 3 with multiple orders. You can create a new user in Amazon Cognito and sign in to see that no data from other users can be accessed. The implementation is detailed in Figure 2.
Clean up
To avoid incurring future charges, delete the resources created during this walkthrough. From the cdk folder of the repository, run the following command:
cdk destroy
Conclusion
Enabling secure multi-tenant capabilities in AI assistants is crucial for maintaining data privacy and preventing unauthorized access. By following the approach outlined in this blog post, you can create an AI assistant that isolates tenants while using the power of large language models.
The key points to remember are:
- When building multi-tenant SaaS applications, always enforce tenant isolation (leverage IAM where ever possible).
- Securely pass tenant and user context between deterministic components of your application, without relying on an AI model to handle this sensitive information.
- Use Agents for Amazon Bedrock to help build an AI assistant that can securely pass along tenant context.
- Implement isolation at different layers of your application to verify that users can only access data and resources associated with their respective tenant and user context.
By following these principles, you can build AI-powered applications that provide a personalized experience to users while maintaining strict isolation and security. As AI capabilities continue to advance, it’s essential to design architectures that use these technologies responsibly and securely.
Remember, the sample application demonstrated in this blog post is just one way to approach multi-tenant AI assistants. Depending on your specific requirements, you might need to adapt the architecture or use different AWS services.
To continue learning about generative AI patterns on AWS, visit the AWS Machine Learning Blog. To explore SaaS on AWS, start by visiting our SaaS landing page. If you have any questions, you can start a new thread on AWS re:Post or reach out to AWS Support.
About the authors
 Ulrich Hinze is a Solutions Architect at AWS. He partners with software companies to architect and implement cloud-based solutions on AWS. Before joining AWS, he worked for AWS customers and partners in software engineering, consulting, and architecture roles for 8+ years.
 Florian Mair is a Senior Solutions Architect and data streaming expert at AWS. He is a technologist that helps customers in Europe succeed and innovate by solving business challenges using AWS Cloud services. Besides working as a Solutions Architect, Florian is a passionate mountaineer and has climbed some of the highest mountains across Europe.