
In the field of technology and creative design, logo design and creation has adapted and evolved at a rapid pace. From the hieroglyphs of ancient Egypt to the sleek minimalism of today’s tech giants, the visual identities that define our favorite brands have undergone a remarkable transformation.
Today, the world of creative design is once again being transformed by the emergence of generative AI. Designers and brands now have opportunities to push the boundaries of creativity, crafting logos that are not only visually stunning but also responsive to their environments and tailored to the preferences of their target audiences.
Amazon Bedrock enables access to powerful generative AI models like Stable Diffusion through a user-friendly API. These models can be integrated into the logo design workflow, allowing designers to rapidly ideate, experiment, generate, and edit a wide range of unique visual images. Integrating it with the range of AWS serverless computing, networking, and content delivery services like AWS Lambda, Amazon API Gateway, and AWS Amplify facilitates the creation of an interactive tool to generate dynamic, responsive, and adaptive logos.
In this post, we walk through how AWS can help accelerate a brand’s creative efforts with access to a powerful image-to-image model from Stable Diffusion available on Amazon Bedrock to interactively create and edit art and logo images.
Image-to-image model
The Stability AI’s image-to-image model, SDXL, is a deep learning model that generates images based on text descriptions, images, or other inputs. It first converts the text into numerical values that summarize the prompt, then uses those values to generate an image representation. Finally, it upscales the image representation into a high-resolution image. Stable Diffusion can also generate new images based on an initial image and a text prompt. For example, it can fill in a line drawing with colors, lighting, and a background that makes sense for the subject. Stable Diffusion can also be used for inpainting (adding features to an existing image) and outpainting (removing features from an existing image).
One of its primary applications lies in advertising and marketing, where it can be used to create personalized ad campaigns and an unlimited number of marketing assets. Businesses can generate visually appealing and tailored images based on specific prompts, enabling them to stand out in a crowded marketplace and effectively communicate their brand message. In the media and entertainment sector, filmmakers, artists, and content creators can use this as a tool for developing creative assets and ideating with images.
Solution overview
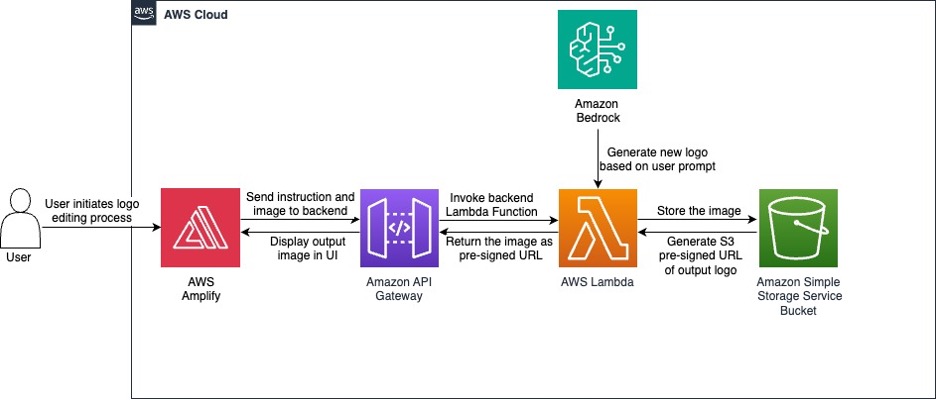
The following diagram illustrates the solution architecture.

This architecture workflow involves the following steps:
- In the frontend UI, a user chooses from one of two options to get started:
- Generate an initial image.
- Provide an initial image link.
- The user provides a text prompt to edit the given image.
- The user chooses Call API to invoke API Gateway to begin processing on the backend.
- The API invokes a Lambda function, which uses the Amazon Bedrock API to invoke the Stability AI SDXL 1.0 model.
- The invoked model generates an image, and the output image is stored in an Amazon Simple Storage Service (Amazon S3) bucket.
- The backend services return the output image to the frontend UI.
- The user can use this generated image as a reference image and edit it, generate a new image, or provide a different initial image. They can continue this process until the model produces a satisfactory output.
Prerequisites
To set up this solution, complete the following prerequisites:
- Pick an AWS Region where you want to deploy the solution. We recommend using the
us-east-1 - Obtain access to the Stability SDXL 1.0 model in Amazon Bedrock if you don’t have it already. For instructions, see Access Amazon Bedrock foundation models.
- If you prefer to use a separate S3 bucket for this solution, create a new S3 bucket.
- If you prefer to use localhost for testing the application instead of Amplify, make sure python3 is installed in your local machine.
Deploy the solution
To deploy the backend resources for the solution, we create a stack using an AWS CloudFormation template. You can upload the template directly, or upload it to an S3 bucket and link to it during the stack creation process. During the creation process, provide the appropriate variable names for apiGatewayName, apiGatewayStageName, s3BucketName, and lambdaFunctionName. If you created a new S3 bucket earlier, input that name in s3BucketName – this bucket is where output images are stored. When the stack creation is complete, all the backend resources are ready to be connected to the frontend UI.
The frontend resources play an integral part in creating an interactive environment for your end-users. Complete the following steps to integrate the frontend and backend:
- When the CloudFormation stack deployment is complete, open the created API from the API Gateway console.

- Choose Stages in the navigation pane, and on the Stage actions menu, choose Generate SDK.

- For Platform, choose JavaScript.

- Download and unzip the JavaScript SDK .zip file, which contains a folder called
apiGateway-js-sdk. - Download the frontend UI index.html file and place it in the unzipped folder.
This file is configured to integrate with the JavaScript SDK by simply placing it in the folder.

- After the
index.htmlis placed in the folder, select the content of the folder and compress it into a .zip file (don’t compress theapiGateway-js-sdkfolder itself.)

- On the Amplify console, choose Create new app.
- Select Deploy without Git, then choose Next.

- Upload the compressed .zip file, and change the application name and branch name if preferred.
- Choose Save and deploy.

The deployment will take a few seconds. When deployment is complete, there will be a domain URL that you can use to access the application. The application is ready to be tested at the domain URL.
CloudFormation template overview
Before we move on to testing the solution, let’s explore the CloudFormation template. This template sets up an API Gateway API with appropriate rules and paths, a Lambda function, and necessary permissions in AWS Identity and Access Management (IAM). Let’s dive deep into the content of the CloudFormation template to understand the resources created:
- PromptProcessingAPI – This is the main API Gateway REST API. This API will be used to invoke the Lambda function. Other API Gateway resources, methods, and schemas created in the CloudFormation template are attached to this API.
- ActionResource, ActionInputResource, PromptResource, PromptInputResource, and ProxyResource – These are API Gateway resources that define the URL path structure for the API. The path structure is
/action/{actionInput}/prompt/{promptInput}/{proxy+}.The{promptInput}value is a placeholder variable for the prompt that users input in the frontend. Similarly,{actionInput}is the choice the user selected for how they want to generate the image. These are used in the backend Lambda function to process and generate images. - ActionInputMethod, PromptInputMethod, and ProxyMethod – These are API Gateway methods that define the integration with the Lambda function for the POST HTTP method.
- ActionMethodCORS, ActionInputMethodCORS, PromptMethodCORS, PromptInputMethodCORS, and ProxyMethodCORS – These are API Gateway methods that handle the cross-origin resource sharing (CORs) support. These resources are crucial in integrating the frontend UI with backend resources. For more information on CORS, see What is CORS?
- ResponseSchema and RequestSchema – These are API Gateway models that define the expected JSON schema for the response and request payloads, respectively.
- Default4xxResponse and Default5xxResponse – These are the gateway responses that define the default response behavior for 4xx and 5xx HTTP status codes, respectively.
- ApiDeployment – This resource deploys the API Gateway API after all of the preceding configurations have been set. After the deployment, the API is ready to use.
- LambdaFunction – This creates a Lambda function and specifies the type of runtime, the service role for Lambda, and the limit for the reserved concurrent runs.
- LambdaPermission1, LambdaPermission2, and LambdaPermission3 – These are permissions that allow the API Gateway API to invoke the Lambda function.
- LambdaExecutionRole and lambdaLogGroup – The first resource is the IAM role attached to the Lambda function allowing it to run on other AWS services such as Amazon S3 and Amazon Bedrock. The second resource configures the Lambda function log group in Amazon CloudWatch.
Lambda function explanation
Let’s dive into the details of the Python code that generates and manipulate images using the Stability AI model. There are three ways of using the Lambda function: provide a text prompt to generate an initial image, upload an image and include a text prompt to adjust the image, or reupload a generated image and include a prompt to adjust the image.
The code contains the following constants:
- negative_prompts – A list of negative prompts used to guide the image generation.
- style_preset – The style preset to use for image generation (for example,
photographic,digital-art, orcinematic). We useddigital-artfor this post. - clip_guidance_preset – The Contrastive Language-Image Pretraining (CLIP) guidance preset to use (for example,
FAST_BLUE,FAST_GREEN,NONE,SIMPLE,SLOW,SLOWER,SLOWEST). - sampler – The sampling algorithm to use for image generation (for example,
DDIM,DDPM,K_DPMPP_SDE,K_DPMPP_2M,K_DPMPP_2S_ANCESTRAL,K_DPM_2,K_DPM_2_ANCESTRAL,K_EULER,K_EULER_ANCESTRAL,K_HEUN,K_LMS). - width – The width of the generated image.
handler(event, context) is the main entry point for the Lambda function. It processes the input event, which contains the promptInput and actionInput parameters. Based on the actionInput, it performs one of the following actions:
- For
GenerateInit, it generates a new image using thegenerate_image_with_bedrockfunction, uploads it to Amazon S3, and returns the file name and a pre-signed URL. - When you upload an existing image, it performs one of the following actions:
- s3URL – It retrieves an image from a pre-signed S3 URL, generates a new image using the
generate_image_with_bedrockfunction, uploads the new image to Amazon S3, and returns the file name and a pre-signed URL. - UseGenerated – It retrieves an image from a pre-signed S3 URL, generates a new image using the
generate_image_with_bedrockfunction, uploads the new image to Amazon S3, and returns the file name and a pre-signed URL.
- s3URL – It retrieves an image from a pre-signed S3 URL, generates a new image using the
The function generate_image_with_bedrock(prompt, init_image_b64=None) generates an image using the Amazon Bedrock runtime service, which includes the following actions:
- If an initial image is provided (base64-encoded), it uses that as the starting point for the image generation.
- If no initial image is provided, it generates a new image based on the provided prompt.
- The function sets various parameters for the image generation, such as the text prompts, configuration, and sampling method.
- It then invokes the Amazon Bedrock model, retrieves the generated image as a base64-encoded string, and returns it.
To obtain a more personalized outputs, the hyperparameter values in the function can be adjusted:
- text_prompts – This is a list of dictionaries, where each dictionary contains a text prompt and an associated weight. For a positive text prompt, one that you would like to associate to the output image, weight is set as 1.0. For all of the negative text prompts, weight is set as -1.0.
- cfg_scale – This parameter controls the potential for randomness in the image. The default is 7, and 10 seems to work well from our observations. A higher value means the image will be more influenced by the text, but a value that’s too high or too low will result in visually poor-quality outputs.
- init_image – This parameter is a base64-encoded string representing an initial image. The model uses this image as a starting point and modifies it based on the text prompts. For generating the first image, this parameter is not used.
- start_schedule – This parameter controls the strength of the noise added to the initial image at the start of the generation process. A value of 0.6 means that the initial noise will be relatively low.
- steps – This parameter specifies the number of steps (iterations) the model should take during the image generation process. In this case, it’s set to 50 steps.
- style_preset – This parameter specifies a predefined style or aesthetic to apply to the generated image. Because we’re generating logo images, we use
digital-art. - clip_guidance_preset – This parameter specifies a predefined guidance setting for the CLIP model, which is used to guide the image generation process based on the text prompts.
- sampler – This parameter specifies the sampling algorithm used during the image generation process to repeatedly denoise the image to produce a high-quality output.
Test and evaluate the application
The following screenshot shows a simple UI. You can choose to either generate a new image or edit an image using text prompts.

The following screenshots show iterations of sample logos we created using the UI. The text prompts are included under each image.


Clean up
To clean up, delete the CloudFormation stack and the S3 bucket you created.
Conclusion
In this post, we explored how you can use Stability AI and Amazon Bedrock to generate and edit images. By following the instructions and using the provided CloudFormation template and the frontend code, you can generate unique and personalized images and logos for your business. Try generating and editing your own logos, and let us know what you think in the comments. To explore more AI use cases, refer to AI Use Case Explorer.
About the authors
 Pyone Thant Win is a Partner Solutions Architect focused on AI/ML and computer vision. Pyone is passionate about enabling AWS Partners through technical best practices and using the latest technologies to showcase the art of possible.
 Nneoma Okoroafor is a Partner Solutions Architect focused on helping partners follow best practices by conducting technical validations. She specializes in assisting AI/ML and generative AI partners, providing guidance to make sure they’re using the latest technologies and techniques to deliver innovative solutions to customers.